

Building The Objects Of Your Desire
HOW TO BUILD ALL TYPES OF OBJECTS USING EVERBLOCK® MODULAR BRICKS
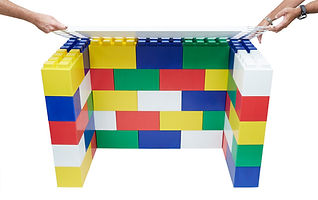
Its Easy To Build With EverBlock®
CONNECTING MODULES
Each Block has a series of connector lugs, that are designed to nest into the underside of the next block. Sections can be staggered in 3" intervals, so that 1, 2, 3, or 4 of the lug sets nest into the other block.
Lugs are designed to pressure fit into corresponding slots on the underside of the block on top. Underside ribbing provides structural support and a tight fit.
To begin, simply align each new block over the block below and center over the lugs that you want to connect with. Press down until you can't push any further and blocks are fully connected.

Lugs nest in friction fit receivers in various positions
VARYING BLOCK TYPE, LUG SPACING, AND BLOCK DIRECTION
Utilize a combination of block types, lug spacing, and block direction to create your object. Alternate as needed to create unique designs and consider the structural implication of aligning seam lines (when seams are aligned the construction is not as strong and we suggest staggering blocks).
Change block rotation to provide strength and to extend your object in another direction. This is ideal for buildings, displays, and other multidirectional structures.
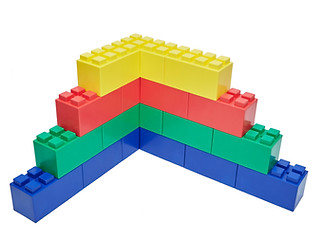
Stagger blocks and change directions as needed
Use smaller (4 lug) blocks and different spacing (i.e. 2,4,6, or 8 lugs connected) to create more detail and resolution for your objects and based on your specific needs.
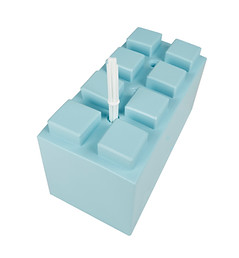
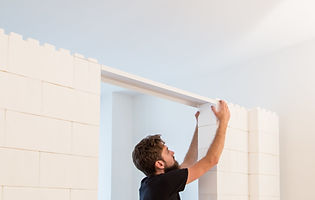
FINISHING THE TOP OF YOUR OBJECTS
To create a more finished look for your object, we have created finishing pieces that are smooth topped pieces that snap to the top of your object. The are used to cover the connector lugs of each piece and can be used to create tops for tables, benches, and other objects that require a more finished look.
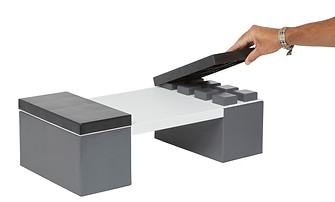
Simple nest EverBlock finishing caps on top
of the connector lugs of the blocks below to create a clean, smooth top surface.
You may also attach third party shelves and panels to create desks, displays, and other interesting objects or utilize EverBlock shelving or desktops.
REINFORCING AND STRENGTHENING YOUR OBJECT
Staggering Blocks
Staggering blocks, so that the vertical seam lines are not aligned, will increase the strength of your object in the same way masons utilize this technique to strengthen walls. This method can be used when creating longer objects or taller walls that need to withstand wind, lateral pressure, or support roofs or other objects.
Using Support Rods or Dowels
Depending on the size, application, or type of object you are building, it may be necessary to re-inforce your object for additional stability. The EverBlock reinforcement pins can be used to tighten the fit between blocks and reinforce your structure so that objects can be transported more easily in one piece. Insert these into the integrated channels that run through each block and into the blocks below or above. You can also use 1/2" rebar, wooden dowels, or PVC rod or tubing to provide added strength. Rebar or other support material can also be inserted into or fastened to the ground or support base below for additional strength.

Stagger blocks and alternate sizes for strength and to meet your design objectives
Reinforcement Pins are used to strengthen the connection between blocks
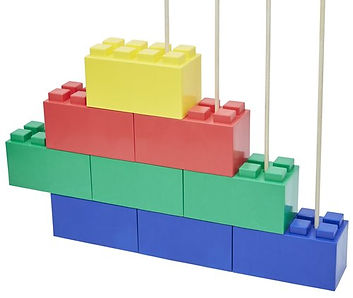
Once inserted, the pins and support rods will keep blocks from separating and provide additional wind loading capabilities and structural strength. Threaded rods may be used in conjunction with nuts to more tightly connect blocks to each other and enhance strength further.
For more information on reinforcing constructions, visit our Advanced Building Techniques Section.
Insert reinforcement rods to reinforce your objects
ADDING SHELVES, DESKTOPS AND LINTELS TO YOUR BUILD
The EverBlock system features engineered shelves, desktops, and lintel pieces that slot neatly onto your creations, enabling you to create complex furniture units, displays, and works spaces as well as facilitate the building of doorways, windows, and other openings that require blocks to be placed above the opening.
Each powder coated steel EverBlock Shelf, Desktop, or Lintel contains pre-cut receiver holes that allow them to nest over the connector lugs on the EverBlock blocks, both reinforcing the creation and providing a smooth surfaces for computers, TV's, books, and storage.
Creating Doorways and Window Openings
Use the EverBlock metal Lintel piece to span 3ft openings between blocks and to provide support for blocks that must be placed above the opening. The Lintel piece (which also may be used as a shelf) fits over adjacent block lugs and provides a solid surface upon which blocks can be laid and built up above.

For more information on adding doorways to your construction, visit our Advanced Building Techniques Section
EVERBLOCK ACCORDION DOOR INSTALLATION GUIDE
STEP ONE:
- Build your EverBlock wall at least 7ft high to install the Accordion Door System.


STEP TWO:
- Apply Track Lubricant to the round nodules at the top of the Accordion Door.
- Slide the round nodules into the Door Lintel with Track.
- Lift the unit and place at the top of the block wall, making sure the holes fit snugly onto the lugs.
STEP THREE:
- Insert 2 Door Handle Pins into one Door Handle, and slot the handle pins through the holes on the Door Panel Unit.
- Attached remaining Door Handle to the Handle Pins and squeeze for a tight fit.


STEP FOUR:
- Secure the Accordion Door to the wall by fastening the Door Support Clips to one side (centered) with the screw.
- Then snap that end of the Door Panel into the Clips.
STEP FIVE:
- Align Receiver Channel and fasten with screw.
- Align and fasten the Magnetic Plates along the Channel Receiver.
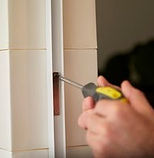
- Tighten all screws with a screwdriver by hand to now strip the screw.


This short instructional video will show you how to properly install your EverBlock Accordion Door System.
SITE SELECTION AND PREPARATION
EverBlock works best on level ground and we recommend you seek a flat surface on which to build your creation. Flat surfaces are easier to find indoors, but some suggested outdoor surfaces are parking lots, playing fields, game courts, etc.
If you need to create a level surface upon which to build, we suggest you level dirt surfaces as best as possible or use plywood sheets laid flat or on wooden stringers to create a level base. You can shim elevation differences, indoors and outside, using wooden shims.
Alternatively, there are several suppliers of modular decks and flooring systems that offer economical solutions over soft or uneven ground.
DISASSEMBLING MODULES
To disassemble modules hold the lower block while pulling up on the upper block. This will dis-engage the pressure fit. Start from the top most row of blocks and move downwards. A flat head screwdriver is useful and will speed and facilitate separation of blocks. Simply insert the flat head screwdriver between upper and lower blocks and rotate to provide leverage for separation.
Depending on the stagger pattern used in the construction of the object, it may be necessary to remove adjacent blocks to reach and remove a specific target block on a lower row.
Stack disassembled blocks neatly for later use and nest where possible to protect connector lugs.