
EverBlock® Building Techniques
ADVANCED BUILDING TECHNIQUES USING EVERBLOCK
CLICK TO GO DIRECTLY TO SECTION:
- Wall Building Patterns and Techniques
- Supporting Freestanding Walls
- Techniques for Displays, Exhibits and Special Events
- Furniture Building Techniques
- Modular and Portable Building Techniques
Wall Building Patterns and Techniques
There exist several techniques for building walls using standard EverBlock modules. Choose what is best for you depending on the application and design aesthetic you are seeking:
SOLID STAGGERED WALL TYPE 1 - STAGGERED BY A HALF BLOCK
A solid staggered wall is the traditional "brick lay pattern" that most people are familiar with. It involves staggering blocks on the half block so that the connection seam of the block row below sits in the middle of the blocks above. This method is one of the strongest methods of construction, which is why it is the most common brick lay patterns in masonry. Half Blocks are used in conjunction with Full Blocks to terminate with a straight vertical line.
SOLID STAGGERED WALL TYPE 2 - STAGGERED BY A QUARTER BLOCK
This version of a solid staggered wall is similar to the standard staggered wall above, except that the blocks are staggered by quarters, such that the next row of Full Blocks is moved over by 1/4 the length of a Full Block (versus 1/2 above). This method is useful when inserting columns in a wall or for as aesthetically different look.
OPEN PATTERN STAGGERED WALL

COMBINATION WALL - TOP STAGGERED / BOTTOM SOLID
The combination wall is simply a lower section using a standard solid stagger pattern with a top section utilizing the open stagger pattern. This creates a very attractive wall that allows some light and air to flow through, while still providing privacy. This wall variation provides a unique architectural look and is perfect for offices and public areas.
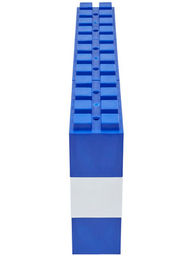
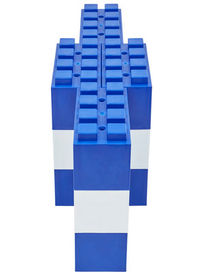
ADDING THE EFFECT OF "BASE MOLDING" AND A CENTER STRIPES
Easily create a more finished look by alternating the color of the first row of blocks. Typical combinations might be a Black bottom row of blocks with the rest of the wall being another color or colors (White, Grey, etc). You can vary color choices depending on the color scheme and look you are trying to achieve.
It is also quite beautiful to do a "stripe" along the middle of a wall. We typically recommend a 2ft stripe for typical 7ft, 8ft or 9ft walls.
Supporting FreeStanding Walls (Indoor)
As walls get taller, they may require additional stabilization or support. We recommend choosing a wall width that is suited to the height of the wall and which doesn’t require additional stabilization or reinforcement, but recognize that this is often not feasible. There are several methods to further stabilize and secure a freestanding wall and depending on the application it may be necessary to utilize several of the below methods simultaneously. You should also consider internal support ribs or reinforcements pins, depending on your specific need. For larger or more complex walls, we recommend you review your wall design with a local engineer or contractor.
Using "T" or “L” Corner To Stabilize a Wall
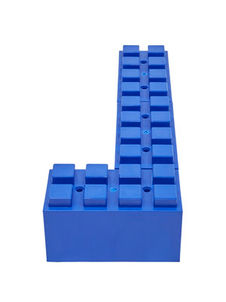
For free standing walls, it is always good to consider putting a 90 degree “L” at the origin, or termination of the wall, or adding a “T” at the end of the wall. For walls over 8ft long it is recommended to use a buttress of some type to provide additional stabilization. This can be a simple stabilizing flare out of the wall, or a complete wall extension. Adding such an “L” or “T” will greatly enhance the stability of your wall.
SMALL L METHOD (12" WIDE)
Alternate between a rotated Full Block, and a Half Block and straight Full Block. Repeat the pattern based on the wall height.
LARGE L METHOD (18" WIDE)
Alternate between a rotated Full Block and a straight Full Block, and a Full Block and Half Block. Repeat the pattern based on the wall height.
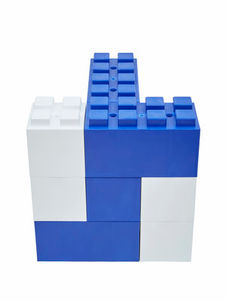
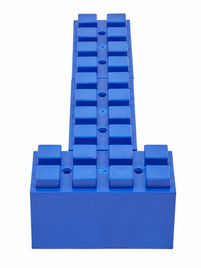
LARGE T METHOD (18" WIDE)
Alternate between a rotated Full Block and Half Block, and straight Full Block and two Half Blocks. Repeat the pattern based on the wall height. It is also possible to do an even larger "T" by adding rotated Full Blocks on both sides of a straight blocks and then utilizing a rotated Full Block, two Half Blocks, and Two Quarter Blocks and repeating the patterns. Contact us for more details about this method.
SMALL T METHOD (12" WIDE)
Alternate between a rotated Full Block, and a straight Full Block and two Quarter Blocks. Repeat the pattern based on the wall height.
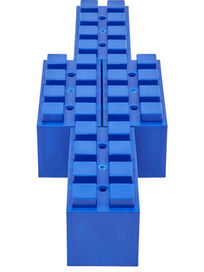
HEAVY T METHOD (12" WIDE) - THICK COLUMN
Alternate between two straight Full Blocks and a rotated Full Block, a straight Full Block and two Quarter Blocks. Repeat the pattern based on the wall height.
Adding Columns (or Fyling Buttresses) Along The Length of A Wall For Added Stability
It is also possible to add a protrusion (Flying Butress) or column in the middle of the wall for additional stability over longer runs. This is recommended for longer walls or walls over 6-7ft.
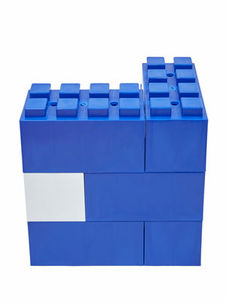
NARROW INTERNAL COLUMN METHOD
Use this method to build columns within a wall for added stability and strength. This method utilizes a rotated Full Block flanked by two quarter blocks. The next row has two QuarterBlock placed on top of the rotated Full Block and the wall is continued, staggered on the Half Block interval.
THICK INTERNAL COLUMN METHOD
For a stronger internal column, use two straight Full Blocks, offset in the middle of a row of straight Full Blocks to create the first layer for a reinforcement column. Use Quarter Blocks on the next row above the offset blocks, while repeating a standard solid wall stagger pattern (see Solid Staggered Wall Type 1 above) for the rest of the wall. This method may also be used with the Solid Staggered Wall Type 2. We recommend internal columns approximately every 7-8ft for 7ft-9ft walls.
Anchoring A Freestanding Wall And Conneting An EverBlock Wall to A Fixed Wall
When building a freestanding wall it is often useful to reinforce or anchor the freestanding wall to an adjacent fixed wall. This can be achieve using either an angle channel along the entire length of the wall or angle brackets placed at various points on the wall.
Angle Channel
Use standard PVC, aluminum, polished chrome, or galvanized steel angle channel to both reinforce and secure your freestanding wall and also to smooth and conceal and gap between the wall and the adjacent wall. PVC angle channel is particularly useful for loft walls and other freestanding room dividers that are being used for a decorative application and where an attractive transition from the fixed wall to the modular wall is desired.
We recommend using two angle channels, one on either side of the block wall, to secure the wall in place. Fasten the channel to the wall with screws or adhesive. Depending on the application, it may not be necessary to screw or adhere the channel to the blocks themselves, but rather the positioning of the wall blocks between the channels is sufficient to secure the wall.
Angle Brackets
L shaped angle brackets are a good way to anchor a freestanding wall quickly and easily. Simply use standard angle brackets in plastic, galvanized steel, stainless steel, or other materials to fasten blocks to the adjacent wall. Due to the nesting nature of the EverBlock it is typically not necessary to secure all blocks, but rather only a series of blocks along the height of the wall.
Screw one side of the angle brackets into the wall and the other into the EverBlock's to provide stability for the freestanding wall.

Use angle channeling to secure EverBlock room dividers and freestanding walls to adjacent fixed walls

Use angle brackets to secure EverBlock to walls and other fixed objects or to connect shelving to EverBlock
Anchoring Your Constructions
Some applications, where you are building taller or more narrow objects may require anchoring to the ground. Use rebar, inserted into the cable channels, and driven 2-3ft into the ground below for additional support. For additional holding properties on outdoor ground surfaces, it is possible to use standard duckbill anchors, connected to wire, to anchor blocks to the ground. Insert the duckbill ground anchor, following the instructions of the manufacturer, and then thread the wire up through the cable channels in a stack of blocks and tighten and cinch off at the top block. We recommend review by a local engineer for more challenging structural EverBlock applications.
Techniques for Displays, Exhibits, and Special Events
Illuminating EverBlocks
To illuminate white translucent EverBlocks from by inserting LED lighting cables into the blocks.
There are many reasons to illuminate blocks, from creating dramatic visual effects at events to illuminating floors, walls, and entire rooms for various applications.
We recommend flat style 0.5” LED lighting cables, with no wide end caps or couplings, so that the strip can be threaded through the EverBlock cable channel. These types of strips are readily available online and at local home supply stores and come in various lengths.
We do not recommend using traditional style rope lighting (round

plastic enclosed incandescent lighting coils) as they tend to be more difficult to thread through the EverBlock cable channels.
For vertical lighting runs, slide the end of the lighting strip thru the bottommost block layer and pull through the block, until you reach the power chord coupling. Continue feeding the end of the lighting strip up through each block, tensioning at each layer, until the topmost block layer (or the layer where you no longer want blocks to be illuminated). It is useful to insert lighting strips during the building process to ease insertion in each blocks cable channel.
For longer continuous lighting runs, powered off a single source, it is possible to fold the lighting strip towards the next cable channel hole and begin the process of feeding the lights back down through block layers until you reach the bottommost block. Repeat folding and feeding lighting strips up or down through adjacent thru holes as desired.
For horizontal lighting runs you can run the lighting strips between connector lugs and feed up or down a layer through the last thru hole. This method is ideal for illuminated top or bottom layers or sections within complete walls.
Standard off the shelf LED lighting strips can typically be controlled using a wireless remote and feature multiple colors and patterns. Choose the style that best meets your needs.
Creating Steps and Risers
The key to building steps, risers, and platforms is that sections are always connected to adjacent blocks, preventing any individual block from being able to move. Lower steps much nest under adjacent upper blocks and sections should be rotated and staggered to ensure that every block is connected to another in some way. Caps may be used to reinforce the connection between adjacent blocks. Deploy half blocks as needed to allow additional staggering of layers of blocks in as close to a brick-lay pattern as is possible.
Hanging Graphics and Other Accessories
You can run string, wire, or fishing line around the connector lugs to facilitate hanging objects on EverBlock. Alternatively, we recommend drilling right into blocks to insert anchors or mounts for hanging graphics or objects.
Remember that adding additional weight to your construction will change the center of gravity and the balance of your object, and as such you may need to reinforce, anchor, or widen hanging walls. Please refer to the freestanding wall section for additional information about stabilizing a wall.
Running Power, Networking, and other Cables
Power, networking and other cables can be run through the integrated 1/2" channel in each EverBlock module. This is enough for most power cables and networking cables, but it is important to remember that the channel will not accommodate end plugs so you may need to rewire these plugs after running cabling though the blocks.
Another way to run power is to create a gap between two block section walls, within which cables, piping, plumbing, and other accessories can be run.
Inserting Panels (Graphic, Lexan, etc.)
A variety of panels, inserts, and other materials can be inserted within block constructions. Typically sections are simply cut to size and placed in the open gap, nesting up against connector lugs (either in front of between or behind, depending on the aesthetic required). The gap between the outer wall and a lug is 1/2" so 1/2" thick panels nest nicely and sit flush within openings.
Furniture Building Techniques
Suggested Heights and Standards
We typically recommend 43" table heights. This can be achieved with 7 EverBlock's stacked (42" + 1" for the connector lugs).
For chairs and seating we recommend 19" heights, which is 3 blocks stacked (18" + 1" for the connector lugs).
For Coffee tables and sofa-side/chair-side tables we recommend 19" to 25" which is 3 or 4 blocks stacked respectively (18" + 1" for the connector lugs OR 24" + 1" for the connector lugs).
Fastening Table Tops, Counter Tops, and Shelves
While we recommend the specially designed EverBlock shelving and desktops it is also possible to cut and paint plywood as needed or to use glass marble or other materials.
If you want to use your own table tops, desktops, counter tops or shelving to EverBlock, and believe you need additional stability, we recommend fastening them using simple L-shaped angle brackets. These can be screwed directly into the blocks and the shelf or table top. There are several good sources for third party table and desk tops, including Home Depot (Rubbermaid shelving line) or Ikea (we love the Linnmon table top).
Securing Shelving Units to the Adjacent Wall
Angle Brackets are a good way to anchor a freestanding shelving unit for additional security and stability. Simply use standard angle brackets in plastic, galvanized steel, stainless steel, or another durable material to fasten shelving unit blocks to the adjacent wall. Due to the nesting nature of the EverBlock it is typically not necessary to secure all blocks, but rather only a few blocks along the height of the wall.
Screw one side of the angle brackets into the wall and the other into an EverBlock to provide stability for the shelving unit. This is recommended for taller units or for children's rooms where shelving may experience more rigorous use.
Modular and Portable Building Techniques
Beginning Your Structure
coming soon
Reinforcing Your Structure
coming soon
Outdoor Anchoring Techniques
coming soon
Installing Windows and Doors
coming soon
Installing a Roof on Your Structure
coming soon
Running Power, Networking, and other Cables
coming soon


